Making Stilts
Some notes on making stilts, edited from notes (C) by
Peter Sinclair Bendall of Kaltenkirchen/Holstein. This article is
published without any guarantee. EMBL is not responsible for its
contents or any suggestions/information it may contain.
We have made ours since about 1962, the ones I had first were a lot
older than that. Size depends a lot on what you want them for! Street
stilts are best around four feet (1m20) to the wearer's foot, otherwise
you get trouble with road signs. It's also about the maximum for
reaching down to shake hands with children.
Ring stilts or stage stilts can be a bit higher but it's a pain to
get under the proscenium arch or ring-door curtains if they are much
longer. The longest I've seen (on Cody's Circus in England) were
around 3m50.
Supplies
To get started, I recommend that you find at you local timber
merchant the following pieces of softwood. needs to be good quality
with no knots cracks or bends! Hardwoods are much too heavy.
- two, 1m80 long, 50mm * 50mm (2" * 2" "planed all round")
- one, 50cm long, 50mm * 100mm (2" * 4")
- four, 40cm long, 50mm * 25mm (2"* 1")
You'll also need:
- some _hardish_ foam rubber, about 50mm thick when compressed, or a
supply of the white fibre filling that is used in furniture these
days.
- four leather belts - simple ones about 15-25mm wide with really
good buckles OR the really good quality webbing "luggage straps"
- two plain dog collars, good leather ones.
- Some furnishing fabric to cover the foam rubber, You'll need two
pieces around 30 * 60 cm so get a metre of 90cm wide while you're at
it!
- Bolts, wood-screws, washers, tacks.
Construction
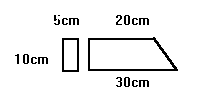
Start by cutting the 50*100 block...
- Mark a narrow face at 20cm from one end and the opposite face at
30cm from that end.
Use a pencil to connect the marks across the wider faces, and saw
across.

These are your two "foot blocks."
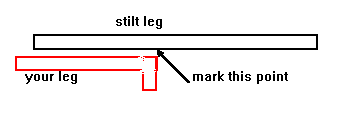
- Sit on the floor!
Place one end of a 1m80 2 length alongside (outside!) your lower leg,
with its end next to your knee. More exactly, level with the bone that
you can feel about an inch below the centre of your kneecap. Mark, or
get someone to mark, the level where your instep comes.

This is where the top of the foot block is going to be.
- Carefully drill holes for the fixing bolts. 6cm from the flat end
and exactly on the centre line of the narrow face of the block and
through the main stilt leg.
You will use the proper "carriage bolts" with a round head, and a
short squared section below it.
Glue and bolt the block to the leg.

Do the other side!
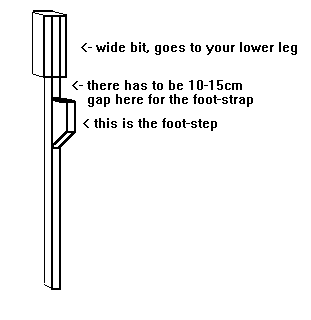
- When it is all dry and ready, lay the stilt with its block to one
side and glue and screw a length of 25mm*50mm to the top end of the
stilt leg. Turn it over and do the other side.
It now looks like this:

Do the other leg!
Now you have two legs, which will of course be worn on the outside of
your legs with your feet on the rests. The difficult part comes now...
- Padding.
You need to "upholster" the side of the wide bit nearest your leg. It
needs to be firm, has to be so that your leg won't slip. I have used
foam plastic and foam rubber (which was better).
I use "upholsters tacks" - the sort of nail with a wide domed
head. You'll see them along the front of quality chairs - and fix one
side of the covering material along the outside of the leg:

then you can tack down on the other side, and the ends.
Do it too thick and too tight for a start! You can
always take out padding later.
- Straps.
You need a supply of wood-screws, the chromed dome-headed sort look
good, and the washers that have a sort of countersunk top.
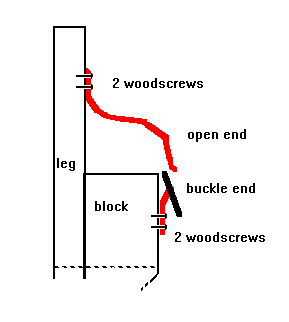
Cut the dog collars. The "shorter" half with the buckle goes on the
face of the block furthest from the stilt leg. There is just enough
room in the space between the top surface of the block and the nut
for two screws. The buckle should not be too far out!
The other half goes with its cut end on the stilt leg, fairly low down
and will buckle to the other half:

The belts are more critical!
They are screwed to the unpadded wide side of the stilt top.
The top belt should be level with the top of the calf muscle,
with your knee bent that's going to be about 5cm below the underside
of your upper leg. Lower than that slips, higher than that hurts!
The bottom belt goes about 12-15cm above your instep.
I prefer the buckles to be at the front about 3 inches (70mm)
from the woodwork so that the "lump" is between leg and pad.
Everything has to be worn tight! So it won't slip!
Notes
I wear firm Sandals (and shorts) for stilt walking and
find that pointing my toes a little bit down gives me very good
control of the legs!
You can read the chapter from "Circus
Runaway Home" to get some tips on how to get started.
- Basically, hang a rope between two trees (or whatever) at your
underarm level, so that you can walk along with the rope under your
arm and if you fall you simply grab.
- A set of aluminum steps are quite good for getting up and down,
modern lorries aren't as good as the old ones - we always used to sit
on the bonnet to get up and down!
- Don't practice on your own!
- Start off walking across and back, using the rope to
turn. Progress to letting go to turn round, and then go solo.
- The easiest walk to begin with is like a soldier "marking
time". Lift your feet high and the stilt will follow your knee (but
much slower.)
- Dance steps like Polka come easy because they are the same sort
of step.
- If you have a tumbler or Judo guru, get your breakfalls up to
scratch. Remember you fall slowly - and remember, always fall
forwards...
Making Stilts /
Juggling Information Service /
help@juggling.org
© 1996 Juggling Information Service. All Rights Reserved.


